Showing posts with label My House. Show all posts

My new house - living room inspiration!

Tuesday, July 2, 2013

FREE IMAGES
We've been in our home for over a month now and things are still looking sparse and unfinished. Part of the reason is that I have just been so busy with my freelance web design business, and also because I want to take my time and really get it right. Since we probably spend the most time in the living room, that's the room I've really been thinking about. Here are a few items I have on my wish list.

Cleaner, sleeker lighting.  The lighting in the home is good quality, but it's too Italian country for my tastes.  I've had my eye out for cleaner, more modern options, like this resin and nickel pendant light.

available at  One Kings Lane
We actually never had a coffee table in our apartment, but we have the space and need for one now.  I think wood and iron is a nice combination, though ideally something even simpler than this is what I'd like.

Okay, maybe accessories are at the bottom of my priority list, but these leaf trays are so beautiful. available at Joss & Main
I'm trying to decide if I want a sectional, or a gorgeous leather armchair and ottoman.  This chair looks heavenly!

All items above available at Joss & Main

None of these rooms exactly embody the look I'm going for, but they are close:

via BHG

via House Beautiful

via Pinterest via Crush Cul de sac


Dreaming of our new home - what is on my inspiration board

Tuesday, May 14, 2013

FREE IMAGES
Our settlement is getting close!  May 28th and I am getting really excited!  Here is the direction I think I'd like to go in with our space:


You know I'm all about a white kitchen!

That backsplash and that counter...swoon

I've always loved this photo.

My dream dining table and chairs! This is from the Washington School House Hotel.

I'm not always a fan of chalkboard walls, but they're prettier than white boards, and it might be a good way to really keep on top of my project milestones for the week.


1-3, 6 via BHG 4, 5. via Elements of Style 

Room Makeovers Galore!

Wednesday, January 30, 2013

FREE IMAGES
Hey, friends!  How's it going?  I've been a little bit of a slacky-slackerson blogger lately.  Not because I'm lacking stuff to blog about, I actually have too much!  I am working on all kinds of fun things for the blog.  The problem is that I've got too many projects and nothing is complete.

And, even though I've got plenty of projects, I just keep adding to my list.  I recently made one little change to my living room which is turning into a complete makeover!

Oops.

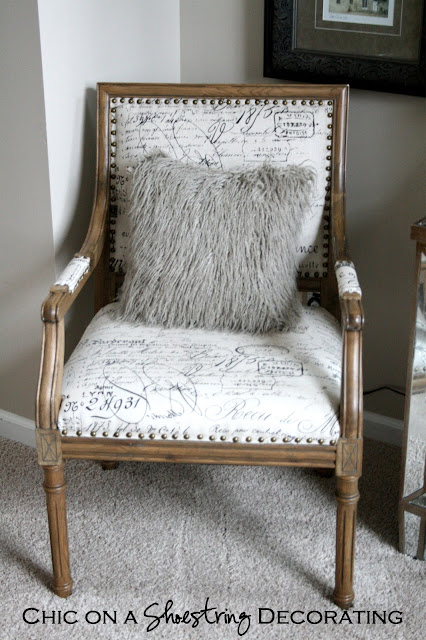
I got a pair of these lovely French script chairs for Christmas.  Well, actually... I picked them out and bought them and said they were  my Christmas present.  Does that count?  They were a crazy good deal (of course or I wouldn't have got them!) but more on that later...
French script occasional chair at Chic on a Shoestring Decorating blog


These beauties suckered me into adding "living room makeover" to my already long list.  I'd been itching to do it anyway so these chairs were the perfect kick start.

So, besides the living room makeover here's what else I'm doing... because inquiring minds want to know.

This could also be called "Home Goals 2013" I guess.  It is still January after all...

To-do List aka: Home Goals 2013

Redecorate formal living room:
  • New pillows, curtains, accessories
  •  New furniture arrangement, selling some old & getting some new 

Redecorate formal dining room:
  • Painting dining room table and chairs with Annie Sloan Chalk Paint
  • Reupholstering chair seats
  • Painting curtains?
Makeover #1 son's bedroom "Industrial/Rustic Chic":
  • Paint
  • Build headboard
  • New furniture arrangement
  • DIY Decor
Makeover #2 son's nursery to big boy room "Rustic Chic":
  • Paint
  • Build Headboard
  • Paint dresser
  • New furniture arrangement
  • DIY Decor
Makeover Office/Mom Cave
  • I'm not sure if it can be called a makeover because it hasn't ever been "made" since we moved here almost 4 years ago... Sheesh!  

Master Bedroom:
  • Reading Corner chair & gallery wall
  • Paint Dresser with AS Chalk Paint

Family Room:
  • Board & Baton install
  • New artwork
Foyer:
  • Wall treatment (stencil, paint, not sure yet....)

My mind is always reeling with all of this fun decorating stuff and I love it.  I'm glad that I have friends like you that feel the same way.  Thanks for your patience with me as I get things done.  I'll have some big reveals soon!

Speaking of big reveals, did you see my beach themed master bathroom reveal?  Probably my favorite reveal to date!


How to Build a Bathroom Light Fixture

Tuesday, January 15, 2013

FREE IMAGES

Thank you all for the sweet comments about our beachy master bathroom makeover.  Everyone seems to love Mr. Chic's DIY light fixture just as much as me.  As promised, here is his tutorial.  Take it away Mr. Chic...

How to make a beachy light fixture by Chic on a Shoestring Decorating


When we moved into our house almost 3 years ago, one of the first things we planned to do was remodel the master bath. Three years later, we finally got working on it. Mrs. Chic may tell you it was because I procrastinated….the real issue was the 94 paint colors and design ideas we went through before deciding we wanted a beach theme that wasn’t didn’t include shower curtains with fish.

One challenge was how to replace the builder grade, 6 light, 5’ long, hung-too-high light fixture that we hated.

See how the light fixture is way up by the ceiling... it looked even worse before we added the DIY mirror frame.

But when we shopped, we found more of the same. We wanted something long, because we have a long mirror over the vanity. We wanted something unique but not in a gaudy way. And of course, we wanted it to be shoestring-able…meaning cheap…I mean…thrifty.

I found a fixture that reminded me of boardwalk lights or ones you find on a pier along a beach. And our Lowe’s store had them on clearance for $12.00 a piece. Regularly $44.00.


I made my case to Mrs. Chic that I could build a box out of scrap wood and MDF, and attach 5 of these lights to make a light fixture nobody else would have.

So off we went.

I measured and grabbed some scrap MDF. I needed three – a top, a bottom and the face.

I laid each light fixture on a piece of MDF to get a general sense of spacing. I traced around the sides of each light once I found spacing I liked. I found the center of the traced circles and, using my speed square, made a line from top to bottom. I did this for each light.

DIY Bathroom Light Fixture by Chic on a Shoestring Decorating


Then I used my L-shaped square, and drew a line exactly down the middle of the MDF, which gave me the center line. Where the vertical line for the center of the lights, and the line down the center met…is where I’d drill the holes for wiring.

DIY Bathroom Light Fixture by Chic on a Shoestring Decorating


I wanted about a ¾” reveal between the top and bottom boards and the face board. So I flipped the face board over so I was looking at the bottom. I put scrap MDF underneath which gave me the right amount of reveal.
DIY Bathroom Light Fixture by Chic on a Shoestring Decorating


I glued all the joints and used my brad nailer to tack on the bottom and top boards. You can see the reveal created by placing boards underneath the face board.

DIY Bathroom Light Fixture by Chic on a Shoestring Decorating


Since I was going to be working with the box, it was heavy, and I didn’t want it to fall apart, I used my brad nailer to tack on some scrap wood to keep everything together while I messed with it.

DIY Bathroom Light Fixture by Chic on a Shoestring Decorating

I screwed the top and bottom pieces to the face every 4 inches on center. Overkill maybe, but I found a brand new box of screws, there was good music on Pandora, and what else did I have to do? Either way, I didn’t want this thing coming apart.

DIY Bathroom Light Fixture by Chic on a Shoestring Decorating

I used construction adhesive to glue a scrap sheet of bead board on the face and drilled through that too. I filled the screw holes with wood filler, sanded, primed, and painted the whole thing, then attached the lights while running the wiring through the holes.

DIY Bathroom Light Fixture by Chic on a Shoestring Decorating

Now…I’m pretty confident around power tools…but electricity…I'm still learning. So my father-in-law helped and it was easier than I thought to connect the lights. We just connected the black wire from one light to the black wire of the one next to it – and so on. Then….the white wire on each light, to the white wire of the next light.

On the middle light, in addition to it being connected to the fixtures to the right and left of it, we added an extra, 12” long piece of 12 gauge wire so we could connect the whole thing to the supply line from the wall.

DIY Bathroom Light Fixture by Chic on a Shoestring Decorating

We killed the power to the switch and pulled off the old fixture (Mrs. Chic thinks she’ll get $20 for it at a garage sale. I wanted to put it on the curb).

DIY Bathroom Light Fixture by Chic on a Shoestring Decorating


I used heavy duty screws to attach a cleat to the wall.

DIY Bathroom Light Fixture by Chic on a Shoestring Decorating


Then, we hung the box on the cleat. We connected the black wire from the wall to the black wire on the box…and connected the copper ground wire to a screw in the back of the box.

I drove 6 or 7 screws through the top of the box to attach it to the cleat, and we were in business!

DIY Bathroom Light Fixture by Chic on a Shoestring Decorating

I knew it worked when Mrs. Chic said she was in love with it. It’s unique for sure, looks beachy without goldfish, and best of all, it was about $70 to build over a couple weekends.

DIY Bathroom Light Fixture by Chic on a Shoestring Decorating

Thanks for taking a look – email us your comments or questions! I’m on to the next project!


Rustic Christmas Mantel

Saturday, December 8, 2012

FREE IMAGES

Hi there!  After Germageddon we are finally getting back to normal around here although I am waaaay behind on my Christmas decorating.  I am getting stuff up slowly but surely...

My Christmas mantel is finally complete!

rustic christmas mantel


This year I wanted to mix up my Christmas mantel a little bit.  The past couple of years I've had somewhat of a candy cane-ish theme.  You can see my Candy Cane Christmas Mantel here..  Anyway, due to my decorating ADD I'm am totally over the candy cane-ish look.  (Big surprise.)  

I loved the rustic look I did on my kitchen console table last year.  DIY Network even featured it on their site!  


I decided I could pull off a rustic Christmas mantel on the cheap  using mostly stuff I already have.  

A few years ago I shared with you that my mantel garland is super scraggly. 

rustic christmas decor
scraggle garland (the one poinsettia is super classy)
Well, I attempted to replace it last year after Christmas when the Hob Lob takes 80% off and I got some really nice and realistic looking blue-spruce-ish greenery.  

It looks so real and beautiful... lying on my floor. 

I could not get this stuff to stay on my mantel!  It has a permanent metal bend in the center that makes it impossible to lie flat.  I tried to bend it back the other way, no luck.  I tried to flatten the bend, no luck.  I considered nailing it to the top of my mantel (I've have done this with other uncooperative decor before (shh, don't tell)) but even this wasn't going to work unless I nailed it in like 5 different places, that's a little much, even for a crazy mantel nailer like me.  My gloriously cheap, beautiful, realistic, blue-spruce-ish greenery was not happening on my mantel.  

What kind of loser greenery doesn't stay on a mantel?  How annoying. 

So that left me with going and buying some new stuff at before Christmas non-discounted prices (you guys know I'm way too cheap for that) or suffering through another year of the dreaded scraggle greenery. 

Scraggle it is.

“The scraggle”, which it will now be known as, had the nerve to have dead lights on it even though I put brand new lights on it last year.  It is SO going in the garbage after Christmas.

Anyway, I managed to dress up the mantel enough to hopefully take away attention from the scraggle… no one will ever notice, right?  Just don’t look real close…
rustic christmas decor

To take away attention from the scraggle I used an old wreath and made it look new by adding a few of these burlap-ish flowers I scored for half off at Hob Lob and adding some burlap ribbon through it.  

I busted out my old 90% off red candle holders that I bought with the intention of spray painting.  They are marvelously Christmas rustic looking so I’m so glad I didn’t.  The birch candles were 80% off from Hob Lob’s after Fall sale.  (they are definitely not just for Fall, score!)  I used some of the Christmas trees that I had and that was that.

rustic christmas decor wreath


I changed up the hearth of my fireplace this year too.  So many times people forget to decorate the fireplace hearth.  It's like dressing your top up with your best Christmas sweater but forgetting your pants.  Don't forget the pants bottom, people! ;)  

rustic christmas decor


I got this huge red lantern for $8 after Christmas last year!

 $8!   

It was 90% off and a super score deal in the game.  It is ginormous and I heart it.  I was planning to put it on my porch but then I couldn’t stand thinking that it would get rained/sleet/snowed/iced on and likely only last a few seasons.  And if it was by my front door I wouldn't get to see it much because I always come in the garage.  Bummer.  

I made an executive decision and saved it’s life by sticking it by my fireplace alongside another lantern that I keep there all year. 

Your welcome, Ginormous Red Lantern.


My friend made the awesome lantern stand that is now a permanent fixture on my fireplace hearth (it will never be pantless again!).   I dressed it up with a few faux greenery swags and a big burlap bow.  

I made the bow myself after following extremely confusing instructions and some cursing I found online.  I’m not sure if I like it, it is kind of like the post is wearing a big, fat, little girl hair bow looking thing.  I added some jingle bells to distract from the poor bow formation.

I changed it up by sticking a Santa in the lantern instead of a candle. Further distracting from the burlap hair bow.
rustic christmas decor


On the other side of the fireplace hearth I stuck some birch branches in my blanket basket but I didn’t have quite enough to fill it properly.  This is when I decided to take advantage of the new blue-spruce greenery and stick it in there with the birch branches, lights and all.  This is the shape it likes to be in, completely bent in the center.  It's happy now.

rustic Christmas decor


Guess what?

I love how it all turned out despite the scraggle.

The scraggle did not doom my Christmas mantel after all. 

Take that the scraggle!!! 

Kate: 1   Scraggle: 0

Stay tuned for more Christmas decor...

And, consider joining me in January for a book club studying 31 Days to Build a Better Blog by ProBlogger Darren Rowse.  Learn more and sign up in the comments here.

31 Days of Decorating on a Shoestring Budget Day 15, Cabinet Hardware

Tuesday, October 16, 2012

FREE IMAGES

Hello there!  We've officially made it through the first half of my 31 day series of decorating on a shoestring budget!  It's going so fast just like this month.  I can't believe Halloween is coming up in in just 2 weeks.  I also can't believe that I saw a few Christmas commercials on TV this weekend!?   (I don't watch much TV either!)  Seriously, we're 2 weeks away from Halloween and Target and Kmart have both started running their Christmas ads!!  Are they for real?!?  They have no shame! 

Oh well, back to my 31 day series.  Miss a day?  Here's where you catch up:

Day 15:  Changing Cabinet Hardware

Is your kitchen looking a little out of style but you can't spend a lot to fix it up?  One inexpensive change you can make that can have a pretty big impact it is to change your cabinet handles and/or knobs.

glazed kitchen cabinets

People seem to forget about this little detail that can really make such a difference for not a whole lot of cash.

We made the change a few months back and I'm so happy with the results.  Our cabinet pulls weren't out of style, they were completely fine, just a little boring... plain stainless steel knobs on everything.  I decided to put a more stylish cup pull on the drawers.  It would make a big difference for a small price.

Since I could easily match stainless steel knobs to new stainless steel cup pulls, I only had to buy new cup pulls for the drawers leaving the cabinet doors as is.  Consider doing this if your current hardware isn't too shabby.  This cut the cost by more that half because we have more cabinet doors than drawers.

I got mine from a wholesaler I work with but you can find some decent pulls at Target and even Wal-Mart.


I enlisted my favorite handy man Mr. Chic to do the labor for me because he's faster with the drill.  But really, this one is easy enough that someone who is a power tool rookie could handle it.

Here's a little picture of all the tools you need (which aren't very many).

Tools:

  • Cordless drill
  • Proper size drill bit
  • New cabinet pulls (most come with the screws needed to attach them)
  • Measure Pro Cabinet Hardware Installation Kit (or something similar)
  • Marker or pen
  • Small screwdriver


We didn't end up using the grips, we thought we'd have to use them to hold on our measuring tool but it ended up fitting over the top of the drawer.

Let's get started...

First, remove the old knobs (Duh).  Use the smallest screwdriver you've got, the screw head will be inside the drawer.  Having a short little screwdriver helps avoid taking everything out of the drawer to get to the screw.

Once you've got the old knob off it's time to mark the drill holes for the new pulls.

Mr. Chic found this handy-dandy and inexpensive "Measure Pro Cabinet Hardware Installation Kit" at Menards and it made this job foolproof!  


Since the center of the drawer was already marked by the old cabinet knob it was really easy to find, the new pulls had a 3 inch span so we found it on our measuring tool and made the marks for the new holes.  Make sure you check your new pull measurement before you drill!

This little Measure Pro thing-ma-jig makes sure that your new holes will be placed properly.  It takes all of the guess work out of it, highly recommended!  And no, they did not sponsor this post!


Now that you've got your new holes marked, it's time to drill!

This will make some major saw dust in your drawers so you may want to take everything out, especially if the drawer has any eating utensils in it.  It's a good excuse to give your drawers a good wipe down.  Once I got into mine, the were really kind of grosser than I expected... lots and lots of crumbs!

Now that the holes are drilled and the drawers are wiped out it's time to add your new cup pulls!  Simply stick the new screws through the new holes and screw them by hand into the handle, make sure you tighten them up with a screwdriver once they are attached.


Here is a bad "before" shot that was taken from the real estate listing of the previous owners, the one I took was accidentally deleted by one of my little helpers. :)

This shot is from the previous owners before we moved in!

I'm so happy with the results, what a difference!

Kitchen cabinet cup pulls

Could your kitchen use some new cabinet handles or knobs?  It might make a bigger difference than you think!


Burlap Fall Mantle

Sunday, September 23, 2012

FREE IMAGES
Hey there!  How are you on this lovely fall weekend?  I am doing great.  I did absolutely nothing this Saturday but hang out in my favorite hoody sweatshirt cuddled up on the couch with my boys.  Isn't it nice to just have a lazy day sometimes...

The boys were choosing the tv shows, lately they've been filling up our DVR with reruns of America's Funniest Home Videos.  Instead of deleting them after they watch them, they will actually watch the same ones over and over again and laugh hysterically even though they've already seen it.  It cracks me up to hear them belly laughing at this silly show so I don't mind.

I'll let you in on a little secret... now don't tell my boys but Mommy doesn't think the show is all that funny  (how many times can you watch someone get hit in the groin by a 3 year old with a plastic baseball bat, seriously) so Mommy spent a lot of time staring at the fireplace enjoying her fall mantle. ;)

Anyway, I kept my mantle pretty simple this year, burlap ended up being the theme although I didn't plan it that way.

fall mantle Chic on a Shoestring Decorating


Click here to read full post »

Let's cut a rug...

Tuesday, August 28, 2012

FREE IMAGES
Hello my lovely Chicsters!  How's it going?

Isn't it fun when you find an amazing sale and buy yourself an unexpected and big present?

No, I did not buy myself a new car with a big red bow on top although that would have been super-duper fun.

No, I did not buy myself a new sweater, although fun I don't consider it to be a "big" present... unless it was like a fancy-schmancy $500 cashmere sweater- but get real, you all know me well enough that I would never pay $500 for a sweater.
'
Anywho, my "big" self present was a new rug for our family room!  This is a "big" and exciting present to me... some of you might think I'm crazy for considering a rug to be a big, exciting present but hey, if you like decorating then you get it.

I hadn't planned on buying a new rug anytime soon because I needed a really big one (8x10) and those can get pretty pricey. I was trying to live with the one I had because although it was gross, it was only 3 years old and because I'm a good thrifty girl, I can't just throw out a 3 year old rug, 3 years old... it's practically new!  But how does somebody re-use a gross rug... make it into a faux fur coat?  I'm thinking not... better just keep it as a rug until I come up with a better plan.

Anyway, like I said earlier my other rug was getting pretty gross.  My gross rug was  frieze which is just a fancy word for shag.  It was cream colored which looked nice in the room initially- but man, did it show the dirt.

It really didn't look cream anymore except for under the coffee table where no one could see it.  I was trying to pass if off as light beige but I'm not sure I fooled anyone.  Especially because it was also really matted down and nasty looking even after being vacuumed.

The picture below shows the rug under the coffee table on the left, the high traffic area on the right.

dirty shag rug

O.M.G!!!

I told you it was gross but even I didn't realize it was that bad until I moved the table!  In my defense and so that you won't think I'm a filthy and disgusting person I think the lighting is making it look extra dirty/bad.  But still... Ewww!

That is super embarrassing but I'm keeping it real folks, if you look really close you can even see some crumbs.  Nice.

antique trunk coffee table
The above picture is not a very good picture but it's the only one I could find that really showed the rug.  (I was usually trying to hide it in my pictures.)  It doesn't look quite as terrible as that close up but it isn't exactly looking good either.

I told you I was trying to pass it off as light beige and I meant it.  Luckily all of my guests were too nice to say anything about my horribly gross rug, either that or they were extremely near sighted.

I'd been eyeing a new rug like the one pictured below from Ballard for quite a while but just wasn't ready to drop the fat cash on it to make it mine.

Ballard Designs jute rug
Photo via Ballard Designs

Then another blogger mentioned they found a 75% off rug sale online at Rugs USA (fyi, they did not pay me to write this post).  Of course I couldn't resist looking.  I found almost the exact same rug, but I think mine is actually thicker and nicer for 75% off!  I used a very small portion of my garage sale earnings and ordered it, I paid just over $100 for a huge 8x10 jute rug plus free shipping!


Since it was so cheap I was scared that the quality would be lacking or it would be really scratchy.  Scratchy rugs are bad news for little boys who like to drive cars/trains/trucks all over the floor.  I was pleasantly surprised that it was very soft and thick, especially for a natural fiber rug like this.  Even Mr. Chic said he really likes it instead of his usual "What? That's a new rug?"


It fills the space so much better than the old rug and the natural jute color really warms up the room.  I'm in love!

Have you bought yourself any "big presents" lately??

Linking: Savvy Southern Style, The Shabby Creek Cottage, Tatertots & Jello, Home Stories A to Z